Part of our guide Making Your Product, which puts every article on this topic in the order you will need them.
Key takeaways
- 3D printed prototypes are best at answering early questions about size, shape, feel and fit, and they can answer basic “does the mechanism work” questions when the right process and material are chosen.
- The three processes most inventors are offered behave differently: FDM is low cost and rough, SLA (resin) gives fine detail and smooth surfaces, and SLS or MJF (powder bed) gives tougher nylon parts with no support structures.
- A printed part is not a molded part: in Stratasys data for its ABS-M30 printing material, parts pulled across the layers stretched only 1.8% before breaking, compared with 8.1% when pulled along the layers.
- A print that works on your desk does not prove the production part will pass drop, heat, sunlight or safety testing, so plan to repeat those tests on parts made the way the final product will be made.
You have a design file, and someone has offered to print it. For most inventors, 3D printed prototypes are the first time an idea becomes something you can hold, hand to a friend, or try in the place it will actually be used. Printing needs no mold, so a revised part can follow a design change without new tooling.
The catch is that a printed part can look finished and still mislead you. It may be made of a different plastic, built in layers that are weaker in one direction, and held to looser dimensions than the production part will be. Here is what each common process is good for, what drives cost, how printed parts differ from molded ones, and when to switch methods.
For the full path from idea to factory, see From Napkin Sketch to Invention: The Reality of Product Design and Prototyping.
What can 3D printed prototypes actually prove?
Designers often split prototypes into two kinds:
- Looks-like prototypes show size, shape, color and feel. They don’t need to work.
- Works-like prototypes test the function: the hinge, the clip, the seal, the mechanism. They can look rough, as long as the working parts behave the way the real ones will.
Printing is very good at the first kind and at fit checks, where you confirm that parts assemble, buttons line up and your product fits the thing it attaches to. It can handle many functional tests too, such as whether a latch engages or a part holds a phone. It is weakest at predicting how the production part will hold up over time. Write down the one question each print must answer before you order it.
Which 3D printing process will you be offered?
The standard vocabulary for 3D printing comes from ISO/ASTM 52900, the joint ISO/ASTM terminology standard (the current edition is from 2021, and ISO’s committee lists a revision in draft). According to Wohlers Associates, now part of ASTM International, it sorts machines into seven process categories. Three cover most plastic prototypes an inventor will be quoted.
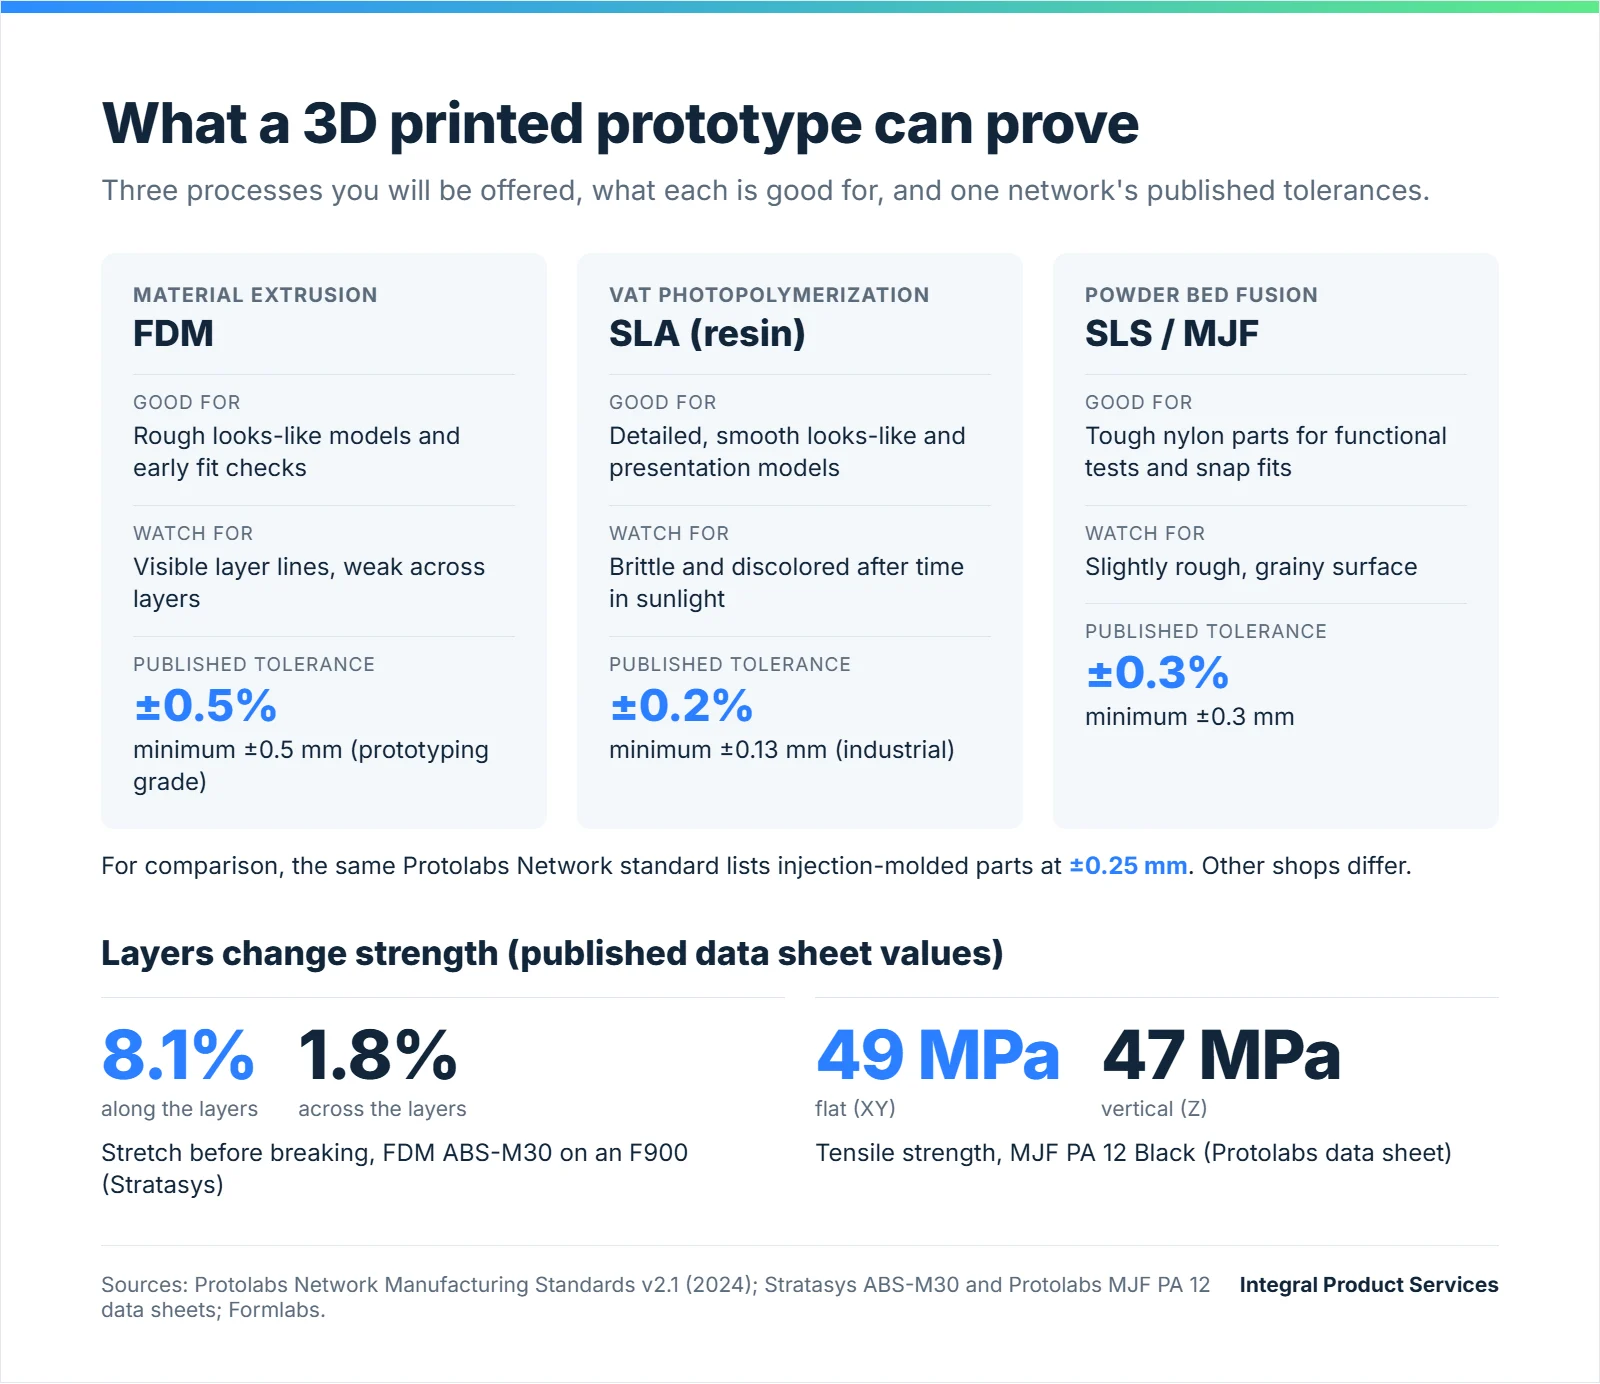
FDM (fused deposition modeling), or material extrusion. Melted plastic is “selectively dispensed through a nozzle or orifice,” one line at a time. It is the familiar desktop printer and, according to the Protolabs Network cost guide, has the lowest base material cost, which makes it a common route to a rough looks-like model or an early fit check. Formlabs notes that FDM parts often show clearly defined layer lines, and many need supports cut away by hand.
SLA (stereolithography), or vat photopolymerization. A liquid resin “in a vat is selectively cured by light-activated polymerization.” Resin prints have fine detail and smooth surfaces, which makes them a good choice for looks-like models, presentation pieces and small precise parts. Formlabs, which makes SLA printers, says SLA prints show no difference in chemical bonding between the vertical axis and the flat plane, so strength is similar in every direction.
SLS (selective laser sintering) and MJF (Multi Jet Fusion), or powder bed fusion. Here “thermal energy selectively fuses regions of a powder bed,” usually nylon. The loose powder supports the part, so no support structures are needed, and the parts are tough enough for many functional tests, snap fits and hinges. The trade-off, in Formlabs’ words, is “a slightly rough, or grainy, surface finish.”
Free to use with credit: you may share this graphic as long as you link back to this article.
How close each process holds dimensions matters for fit checks. Tolerances vary by shop, so treat one company’s published figures as a guide to scale, not a promise. The Protolabs Network Manufacturing Standards (version 2.1, January 2024), which that manufacturing network applies to orders placed through it, list ±0.5% with a minimum of ±0.5 mm for prototyping-grade FDM, ±0.2% with a minimum of ±0.13 mm for industrial SLA, and ±0.3% with a minimum of ±0.3 mm for SLS and MJF. For comparison, the same document gives a standard injection molding tolerance of ±0.25 mm (0.010 in). Other shops publish different figures. A loose fit may be the print, not the design.
What drives the cost and lead time of a printed prototype?
Prices vary widely by shop and quantity, so focus on the drivers. The Protolabs Network guide to 3D printing costs names these:
- Size and volume. Bigger parts use more material and more machine time.
- Process and material. Each process has its own machine and material costs. FDM materials are generally cheapest; powder bed materials cost more but need no supports.
- Supports and finishing. Supports add material and hand labor. Sanding, painting, smoothing or dyeing add more.
- Quantity. Printing has very little setup, which is why it suits one to a handful of parts.
Protolabs calls build time “far and away the most significant cost driver for 3D printing,” and the Protolabs Network guide notes that larger parts take longer to produce. Lead time follows the same logic: a small, unfinished part is quick, while a large, painted shell takes longer. When you ask for quotes, say which question the part must answer. A fit check doesn’t need a painted finish, and a looks-like model doesn’t need engineering-grade nylon.
3D printing vs injection molding: how is a printed part different?
Many plastic consumer products are made by injection molding, where molten plastic is forced into a machined metal mold. Your prototype is standing in for that molded part, and four differences matter.
1. The material is often not the same. Printing plastics are chosen because they print well, and even when the name matches (ABS, nylon), a printing grade can behave differently from a molding grade. Protolabs notes that injection molding comes with more than 100 thermoplastic and thermoset materials, so the production material may have no close printed equivalent.
2. Layers create weak directions. Formlabs puts it plainly: “FDM 3D printed parts are known for being anisotropic due to layer-to-layer differences created by the print process.” That means strength depends on direction. In Stratasys’ published data sheet for its ABS-M30 printing material, samples printed upright on its F900 printer, so the pull ran across the layers, had a yield strength of 27.5 MPa versus 30.8 MPa printed on edge. The bigger gap was in stretch: they elongated only 1.8% before breaking, against 8.1% on edge. In practice, a printed clip can snap along a layer line where a molded one would flex. Powder bed parts show a much smaller gap. Protolabs’ data sheet for MJF PA 12 lists tensile strength of 49 MPa in the flat plane and 47 MPa in the vertical direction. Stratasys calls its figures “typical values intended for reference and comparison purposes only,” so use them for the pattern, not for design.
3. The surface is different. FDM layer lines, SLS graininess and sanded resin all feel different from a molded surface with a specified texture. That matters when the product’s appeal depends on feel or grip.
4. Tolerances differ. In the Protolabs Network figures above, FDM and SLS/MJF tolerances are looser than the molding tolerance, and Protolabs notes that larger prints build up more dimensional error from heat, warping and longer builds.
The reverse problem matters too. A shape that prints easily can be hard to mold: thick walls, deep undercuts or no draft angle (the slight taper that lets a part release from the mold). Printing won’t flag these, so design-for-manufacturing review should start before the design is locked.
When should you move beyond 3D printing?
Once the question becomes “will the real part behave,” look at methods that use production-like materials:
- CNC machining cuts the part from a solid block of plastic or metal. It is useful when you need the real material, solid through, for strength or heat tests. The Protolabs Network standard machines plastic parts to the ISO 2768-m general tolerance class unless a drawing says otherwise.
- Urethane casting makes a silicone mold from a printed master pattern, then pours urethane parts into it. According to Xometry’s process guide, it suits quantities “from one to one hundred,” which makes it a common choice for a small batch of good-looking samples for user testing, photos or early buyer feedback. Cast urethanes resemble production plastics but are not the same material.
- Aluminum or soft tooling is an inexpensive injection mold that produces real molded parts. Protolabs describes its prototype tooling as a way to “Perform functional test with prototypes manufactured in production-grade materials.” It is often the first time you see the part as the factory will make it; weigh that tooling cost against the landed cost your product can support.
A decorative product may go straight from prints to a production mold. Something load-bearing, heated or meant for children usually needs a step in between.
What a desk test can’t tell you
Here is the honest limit. A print that works perfectly on your desk tells you the idea can work. It does not tell you the molded product will survive being dropped, left in a hot car, used outdoors or put through safety testing. Sunlight alone can change the result: Formlabs says resin prints left in the sun “become more brittle and change color due to the 405 nm light and heat present in sunlight.”
Formal testing also expects the real thing. Under the Consumer Product Safety Commission’s rules on relying on component part testing (16 CFR 1109.5), a tested component must be “identical in all material respects to the component parts used in the finished consumer product.” A printed stand-in won’t meet that standard. Budget time to repeat your drop, heat, wear and safety checks on parts made with the production process and material.
Getting from a good print to a manufacturable part draws on several specialties at once (design, molding engineering, materials, sourcing and cost estimating), and coordinating them is a job in itself. Companies weighing a license look for the same evidence; see What Manufacturers Actually Look At Before Licensing an Outside Invention.
Moving from prototype to production?
At Integral Product Services, we help inventors get a manufacturing cost analysis through vetted manufacturers before they commit to tooling or inventory. If you hold a patent or a pending application, you can request a free, no-obligation Patent Review or call us at 813-413-1863.
Not ready for a call? The same page offers our free guide, After You File.
This article is general information, not engineering, legal or regulatory advice. Material values and tolerances come from the published documents cited and vary by machine, material and shop. For product safety and certification requirements, check the official sources and talk to a qualified testing lab or attorney about your specific product.
Sources
- ISO, ISO/ASTM 52900:2021 Additive manufacturing: General principles, Fundamentals and vocabulary, edition 2, November 2021 (confirmed 2025), accessed October 16, 2026
- ISO Technical Committee 261, Some of our ongoing projects, accessed October 16, 2026
- Wohlers Associates (ASTM International), The Seven AM Processes, March 24, 2020, updated June 30, 2022
- Formlabs, FDM vs. SLA vs. SLS: 3D Printing Technology Comparison, accessed October 16, 2026
- Stratasys, ABS-M30 FDM Material Data Sheet, 2026 (MDS_FDM_ABS-M30_0826a), accessed October 16, 2026
- Protolabs, MJF PA 12 Black Material Data Sheet, version 1.2, January 2022
- Protolabs Network, Manufacturing Standards, version 2.1, January 12, 2024
- Protolabs Network, How much does 3D printing cost?, accessed October 16, 2026
- Protolabs, Comparing the Cost between Injection Moulding and 3D Printing, accessed October 16, 2026
- Protolabs, Understanding 3D Printing Tolerances, accessed October 16, 2026
- Protolabs, Prototype Tooling for Injection Molding, accessed October 16, 2026
- Xometry, Urethane Casting, accessed October 16, 2026
- Formlabs Support, What happens to prints that are left out in the sun?, accessed October 16, 2026
- Cornell Law School Legal Information Institute, 16 CFR 1109.5, Conditions, requirements, and effects generally, accessed October 16, 2026
Have a patent or patent pending? Let’s find your next step.
Get a free Patent Review from a Product Launch Specialist. No cost, no obligation, prototype not required.