Part of our guide Making Your Product, which puts every article on this topic in the order you will need them.
Key takeaways
- The product design and prototyping process for a physical consumer product usually runs in six stages: sketch and requirements, CAD, looks-like and works-like prototypes, design for manufacturing (DFM), engineering and pre-production prototypes, and production samples.
- Each stage answers a different question, and none of them answers all of them: a CAD model proves parts fit on screen, a works-like prototype proves the core idea functions, and only a production sample shows what the factory will actually ship.
- Do the design for manufacturing review before the mold is cut: at that point a change means editing a file, while a change after tooling can mean modifying the mold or, for some changes, building a new one.
- A signed “golden sample” gives you and the factory one physical standard to inspect against, and for products that need a CPSC certificate of compliance, the certificate must be based on testing, with children’s products retested after a material change that could affect compliance.
It usually starts on whatever paper is closest: a napkin, the back of an envelope, a notebook page. You see a problem, picture the fix and sketch it. That sketch matters. It is the first step in the product design and prototyping process. But a sketch is not a product, and a factory can’t quote, tool or build from one.
The road from sketch to prototype, and then to a box of finished units, is a series of stages. Each one answers a different question. Skipping one rarely saves money. It moves the problem later, where fixing it means reworking a mold instead of editing a file.
Below are the stages in order: what you decide at each, what it proves, what it can’t, and the warning signs of skipping it. The last stage matters more than it used to for imported goods: since July 8, 2026, importers of products that require a certificate of compliance under U.S. Consumer Product Safety Commission (CPSC) rules have had to file the certificate data electronically with U.S. Customs and Border Protection, under a final rule published in the Federal Register. Goods entered from a foreign trade zone follow on January 8, 2027.
What are the stages of the product design and prototyping process?
Labels vary, but the order for a physical product is consistent. An example in the U.S. Department of Energy’s free Build4Scale training, written for energy hardware innovators, follows a similar path from concept drawing to CAD, to several “works-like” and “looks-like” prototypes, to production. DOE says the course aims to help innovators “avoid the common pitfalls of costly redesign” by teaching manufacturing fundamentals early.
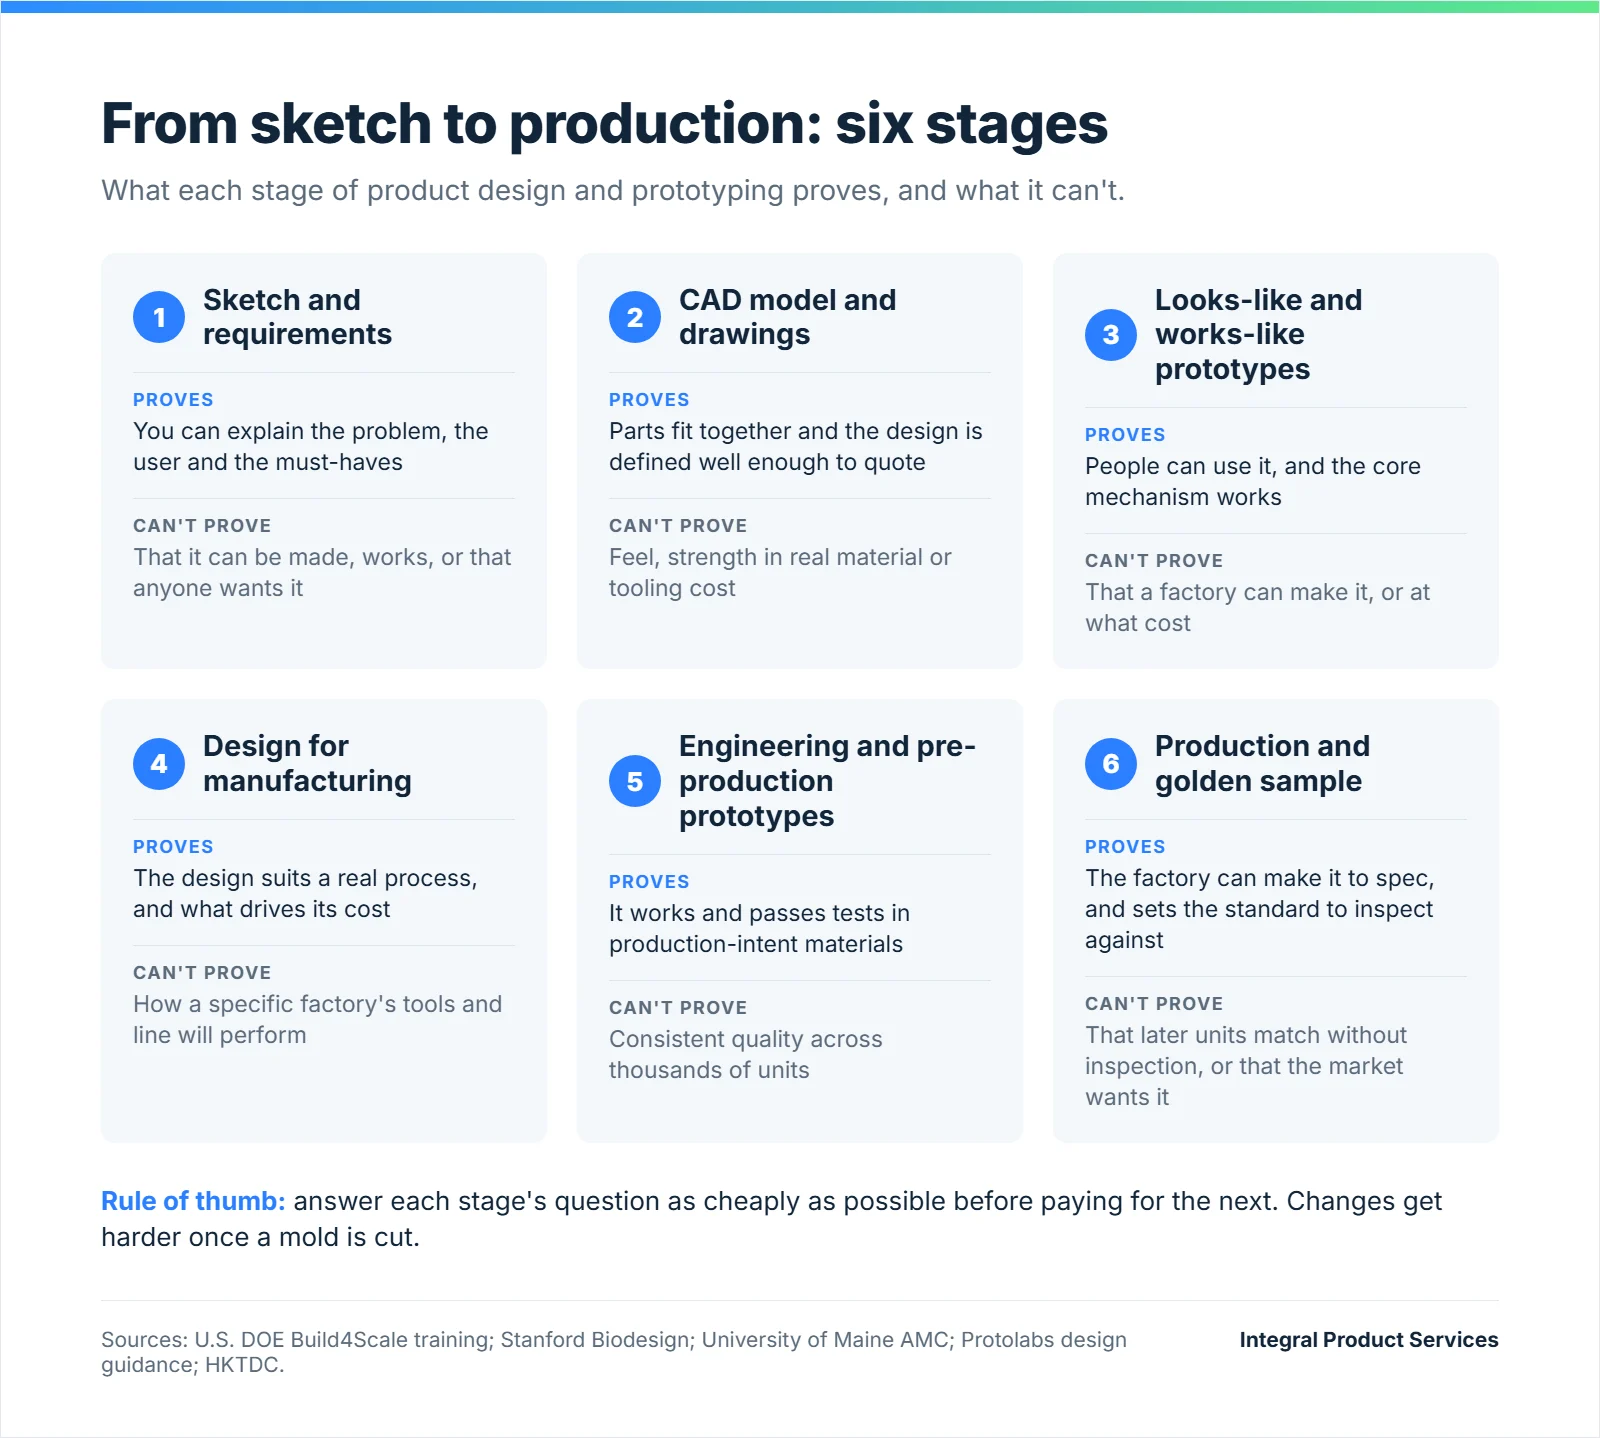
Free to use with credit: you may share this graphic as long as you link back to this article.
A useful rule of thumb: each stage should answer its question as cheaply as possible before you pay for the next one.
Stage 1: Sketch and requirements
What you decide: the problem, the user, where the product will be used, and what it must do. Write it as a short requirements list, separating must-haves from nice-to-haves. For a travel mug, that might be: no leaks when tipped over in a bag, fits a car cup holder, survives the top rack of a dishwasher. Add a target retail price, because it caps what the product can cost to make.
What it proves: that you can explain the idea clearly. What it doesn’t: that it can be made, that it works, or that anyone wants it.
Warning signs you skipped it: a designer keeps stopping to ask basic questions, features pile up with each revision, or quotes from different vendors vary wildly because each one assumed something different.
Stage 2: CAD (computer-aided design)
CAD is a precise 3D digital model of every part, with real dimensions, wall thicknesses and the way parts join. It is the language factories and prototype shops work in.
What you decide: exact dimensions, how parts attach (snaps, screws, hinges), a first choice of material family, and which surfaces matter cosmetically. DOE’s Build4Scale module on the bill of materials and bill of process describes engineering drawings with tolerances (the allowed variation in a dimension), a bill of materials (BOM, the list of every part and quantity) and a bill of process, and warns that if these “are not crystal clear,” the result can be wasted money or improperly built products. Protolabs, a digital manufacturer, asks customers to “output your designs as STEP files,” a standard CAD format, noting that STL files “create problems with molded parts.”
What it proves: that the parts fit together geometrically and that the design is defined well enough to quote. What it doesn’t: how the product feels in the hand, how strong it is in real material, or what it will cost to tool.
Warning signs you skipped it: you have attractive renderings but no editable CAD files, no drawings with tolerances and no BOM. A rendering is a picture of a model, not the model.
Stage 3: Looks-like and works-like prototypes
These are two prototypes for two different questions.
A looks-like prototype shows size, shape, color and feel. The University of Maine’s Advanced Manufacturing Center notes that many 3D-printed parts fall into this group. Stanford Biodesign’s prototyping guide is direct about the order: “The first prototypes to make for any project should be looks-like prototypes.” They are quick and cheap but, the guide notes, offer limited measurable data.
A works-like prototype tests the core mechanism, even if it is ugly. Stanford’s guide puts it plainly: “a works-like prototype does not need to be fully functional.” If it “works enough to generate useful data that addresses a key question,” it has done its job. Later, the two merge into a late-stage “looks like and works like” prototype, which the University of Maine center says may be a reasonable representation of the product before it goes to market.
What you learn: whether people can understand and comfortably use the product, and whether the key function works. Many are 3D printed; for where that method helps and where it falls short, see 3D-Printed Prototypes: What They Are Good For.
What it doesn’t prove: that a factory can make it, at what cost, or that it will hold up in production materials.
Warning signs you skipped it: one expensive, polished prototype took months, testers praised the look but nobody stress-tested the mechanism, or a rough test rig is being shown to buyers as if it were the product.
Stage 4: Design for manufacturing (DFM)
Design for manufacturing (DFM) means adjusting the design so it can be made reliably, at the volume and cost you need, by a specific process. A shape that is easy to 3D print can be hard or expensive to mold.
Classic DFM guidance (rooted in Boothroyd and Dewhurst’s work and taught in engineering courses) starts with reducing part count, eliminating separate fasteners where possible and designing parts that can’t be installed incorrectly. For injection-molded plastic, Protolabs’ design guidance stresses uniform wall thickness, avoiding undercuts (features that make a part hard to eject from the mold), and adding draft, a slight taper so parts release. It says “1 to 2 degrees works very well in most situations.”
Cost drivers to understand: Protolabs puts it simply: “The main determinant of molding cost is the amount of time it takes to produce the tooling.” Complex geometry, undercuts that need side actions, larger parts, high-polish or textured finishes and harder-to-mold materials all add cost. Volume matters too: DOE’s training classifies hard tooling as a fixed cost, so it gets spread across every unit you make. In one Build4Scale case study, credited to Munro & Associates, redesigning a vehicle battery tray as a single molded plastic piece took the part count from 16 to 1 and cut material costs by more than 70 percent. Your numbers will differ. The unit cost that comes out of DFM is also the starting point for landed cost, covered in Landed Cost: The Number Every Licensing Partner and Investor Will Ask For.
What it proves: that the design suits a real process and what drives its cost. What it doesn’t: how a specific factory’s tools and line will perform.
Warning signs you skipped it: quotes come back asking for design changes, a factory proposes extra mold actions you didn’t expect, or the estimated unit cost lands well above your target.
Stage 5: Engineering and pre-production prototypes
These are built with production-intent materials and, as far as possible, production processes. DOE’s Build4Scale describes the beta prototype as “a more polished version of the key features of the hardware product; they can be used directly by a customer,” followed by a pilot run before ramping up. It warns that building a beta prototype with an inadequate process can send “the wrong message to the client regarding whether the final product will meet their requirements.”
What you decide: whether it passes the tests that matter for its category (drops, leaks, heat, any applicable safety standard), whether it assembles cleanly, and when to freeze the design.
Plan for changes. Protolabs explains that metal can be removed from a mold but not added, so features likely to change should be designed “metal safe” (often called steel safe). In its words, “we can usually add plastic in a mold mod, but we can’t ever take away plastic in a mold mod.” Some changes, such as expanding a part at the parting line, “will almost always require a new mold.”
What it proves: that the design works in real materials. What it doesn’t: that the factory will hold that quality across thousands of units.
Warning signs you skipped it: all testing was done on 3D prints, safety testing is scheduled after tooling, or design changes keep arriving after the mold has been cut.
Stage 6: Production samples and the golden sample
The first units off production tooling show what customers will receive. Once one is right, it becomes the golden sample. Andy Church, founder of the quality-inspection firm Insight Quality Services, defines it this way in an article republished on the Hong Kong Trade Development Council’s sourcing site: “A Golden Sample, also called an approval sample, is a sample your manufacturer sends to you before mass production.” These samples “serve as a standard for comparison to all future production goods.” He recommends they be signed, dated and sealed, with copies kept by the factory, the inspector and the buyer.
What you decide: whether to approve, what the written specification says, and how production will be inspected against it.
For regulated products, compliance also hinges on this stage. As the CPSC rule explains, federal law requires certificates for children’s products to be based on testing by a CPSC-accepted third-party lab, and certificates for other regulated products to be based on “a test of each product or a reasonable testing program.” Federal rules for children’s products (16 CFR 1107.23) also require retesting and a new certificate after a material change, such as a new component supplier or a change in how the product is made, that could affect compliance.
What it proves: that the factory can make your product to spec. What it doesn’t: that the 5,000th unit will match the first, which is what inspection is for, or that the market wants it.
Warning signs you skipped it: samples approved from photos, no signed reference unit, or a factory quietly swapping a material without telling you.
What can’t this process tell you?
Every stage above tells you whether the product can be made and whether it works. None of them tells you whether enough people will buy it at a price that pays. A flawless golden sample can still sit in a warehouse. That is a market question, and it is far cheaper to explore before tooling than after, as we explain in Three Tariff Systems in One Year: The Case for Testing Before You Build.
The stages also aren’t always this tidy. A simple one-part product may compress several of them, and a product with electronics may need more rounds. Doing them well draws on industrial design, mechanical engineering, materials, tooling, quality inspection and compliance testing, and coordinating those specialties is a job of its own.
Moving from sketch to production?
At Integral Product Services, we help inventors get a manufacturing cost analysis through vetted manufacturers before they commit to tooling or inventory. If you hold a patent or a pending application, you can request a free, no-obligation Patent Review or call us at 813-413-1863.
Not ready for a call? The same page offers our free guide, After You File.
This article is general information, not legal or regulatory advice. Product safety and certification rules depend on your product and its users, so check the CPSC’s guidance and talk with a qualified testing lab or product safety attorney about your specific product.
Sources
- U.S. Consumer Product Safety Commission, Certificates of Compliance, final rule, 90 FR 1800 (January 8, 2025), effective July 8, 2026 (January 8, 2027 for foreign trade zone entries)
- U.S. Consumer Product Safety Commission, Update: Certificates of Compliance and eFiling, accessed October 16, 2026
- U.S. Department of Energy, Build4Scale Frequently Asked Questions, accessed October 16, 2026
- U.S. Department of Energy, Build4Scale, Module 2A: Bill of Materials and Bill of Process, July 2021
- U.S. Department of Energy, Build4Scale, Module 3A: Design for Manufacturing, Assembly, and Reliability, July 2021
- U.S. Department of Energy, Build4Scale, Module 4A: Beta Prototype and Test Plan and Module 4B: Importance of the Manufacturing Process, July 2021
- Stanford Biodesign, Ross Venook and Alex Bradfield, Prototyping: Build, 2021
- University of Maine Advanced Manufacturing Center, What is a Prototype?, August 7, 2013
- Hong Kong University of Science and Technology, IELM 317 lecture notes, Design For Manufacturing/Assembly (DFM, DFA, DFMA), accessed October 16, 2026
- Protolabs, 9 Mistakes to Avoid When Designing Injection Molded Parts, accessed October 16, 2026
- Protolabs, Draft Angle Guidelines for Injection Molding, accessed October 16, 2026
- Protolabs, Understanding Injection Mold Cost for Parts and Tooling, accessed October 16, 2026
- Protolabs, 6 Ways to Simplify Mold Modifications, accessed October 16, 2026
- Andy Church (Insight Quality Services), via the Hong Kong Trade Development Council sourcing site, What is a Golden Sample in Manufacturing, and Why are They Essential?, accessed October 16, 2026
- Code of Federal Regulations, 16 CFR 1107.23, Material change, via Cornell Legal Information Institute, accessed October 16, 2026
Have a patent or patent pending? Let’s find your next step.
Get a free Patent Review from a Product Launch Specialist. No cost, no obligation, prototype not required.